OPC-UA Connectivity Guide
- Overview
- Compatible Machines
- Prerequisites
- Understanding OPC-UA
- Physical Connection
- Enabling OPC-UA on Your Machine
- Adding the Machine in MachineMetrics
- Configuring Data Collection
- Sample Configurations
- Certificate Management
- OEM-Specific Notes
- Troubleshooting
- Best Practices
- Additional Resources
- Getting Help
Connecting OPC-UA in MachineMetrics establishes a session to your server; it does not by itself define which nodes, variables, and namespaces become execution state, part counts, and alarms. You must configure a Transform Adapter Script (and related data mapping) so OPC-UA reads are translated into MachineMetrics data items. Skipping this step is a frequent cause of “we added the machine but nothing shows up” support cases.
Node / variable mapping and an adapter script are mandatory before you will see data. See Sample Configurations on this page for examples. Contact support@machinemetrics.com if you need more help.
Overview

Siemens 840D sl CNC control panel. Siemens CNC controls (840D sl) use OPC-UA for connectivity, while 840D PL controls require BFC Gateway or I/O. Brother D-Series machines also use OPC-UA.
What is OPC-UA?
OPC-UA (Open Platform Communications Unified Architecture) is a platform-independent, service-oriented architecture for secure and reliable exchange of data in industrial automation. It's an industry standard that ensures seamless information flow among devices from multiple vendors.
Key Characteristics:
- Platform-independent (Windows, Linux, embedded systems)
- Secure communication (encryption, authentication, certificates)
- Rich data modeling capabilities
- Service-oriented architecture
- Maintained by the OPC Foundation
Important Note: Unlike MTConnect or FOCAS, OPC-UA does not standardize the meaning of data points. Each machine make, model, and configuration can have different data structures. This means OPC-UA connections require more initial configuration but provide great flexibility.
Why Use OPC-UA?
When OPC-UA is the Best Choice:
- Machine/controller natively supports OPC-UA
- Need secure, encrypted communication
- Connecting PLCs or automation equipment
- Equipment doesn't support other protocols (FOCAS, MTConnect)
- Connecting diverse equipment types (welders, presses, robots)
Advantages:
- Industry-standard protocol
- Secure by design
- Rich data modeling
- Platform-independent
- Widely supported by automation vendors
Challenges:
- Requires understanding of machine's data model
- Need data map/tag list from manufacturer
- More complex initial configuration
- Certificate management may be required
Who This Guide is For
This guide is for:
- Engineers connecting OPC-UA-capable equipment
- IT personnel configuring secure OPC-UA connections
- Anyone connecting Siemens, Brother, or other OPC-UA machines
- PLC programmers and automation specialists
- System integrators working with diverse equipment
Compatible Machines
Common OPC-UA Equipment
CNC Machine Controls:
- Siemens Sinumerik 828D / 840D SL (with OPC-UA license)
- Okuma OSP-P500 (with OPC UA for Machine Tools option)
- Brother D-Series CNC machines
- Some FANUC robots
- Various DMG MORI machines
- Other modern CNC controls
Manufacturing Equipment:
- Bystronic laser cutters and press brakes
- Industrial robots (ABB, KUKA, Fanuc)
- Automated assembly equipment
- Process machinery
Automation & PLCs:
- Siemens S7 PLCs
- Allen-Bradley (via gateway)
- Beckhoff controllers
- B&R Automation
- Many others
Third-Party OPC-UA Servers:
- Kepware (common gateway/adapter)
- MatrikonOPC
- Softing OPC servers
- Custom implementations
Checking for OPC-UA Support
Check with Manufacturer:
- Consult machine documentation
- Contact machine tool builder support
- Verify control version and options installed
- Ask if OPC-UA license is required
Check on Machine:
- Look for OPC-UA in control settings/menus
- Check license page for OPC-UA option
- Review control software version for OPC-UA support
Verify with Tools:
- Use OPC-UA client software to attempt connection
- Try connecting to
opc.tcp://[machine-ip]:4840 - Common ports: 4840, 4855, 49320, 56000 (varies by implementation)
Prerequisites
Hardware Requirements
- Machine or equipment with OPC-UA server capability
- MachineMetrics Edge device (deployed and activated)
- Ethernet cable (CAT5/CAT6)
- Network access between machine and Edge device
Software Requirements
- OPC-UA server enabled on machine/controller
- OPC-UA license (if required by manufacturer)
- OPC-UA client tool for browsing (UaExpert, opcua-commander, etc.)
- Data map or tag list from machine manufacturer
Information Needed
Before starting, gather:
- Machine IP address
- OPC-UA port number (typically 4840)
- Username and password (if authentication required)
- Security mode and policy (if applicable)
- Data map/tag list showing:
- Node IDs for relevant data
- What each tag represents (status, part count, etc.)
- Data types and units
- Certificate requirements (if any)
Understanding OPC-UA
Architecture
OPC-UA uses a client-server model:
Machine/Controller (OPC-UA Server)
     ↓
Network (TCP/IP)
     ↓
MachineMetrics Edge Device (OPC-UA Client)
     ↓
MachineMetrics Cloud
Components:
- Server: Runs on machine/controller, exposes data
- Client: MachineMetrics Edge device, reads data
- Address Space: Hierarchical structure of available data nodes
- Nodes: Individual data points with unique identifiers
Data Structure
OPC-UA data is organized in a tree-like address space with nodes.
Node ID Format:
ns=2;s=/Channel/State/progStatus(string identifier)ns=3;i=1001(integer identifier)ns=4;g=A7B3...(GUID identifier)
Where:
ns= namespace indexs= string identifieri= integer identifierg= GUID identifier
Data Types:
Simple Types:
- String, Boolean, DateTime
- Double, Float, Int32, Int64
- Guid, LocalizedString
Complex Types:
- Objects (structures with properties)
- Enumerations (predefined value sets)
- Arrays (ordered collections)
Example:
Node: ns=2;s=/Channel/State
  ↳ Property: progStatus (Int32)
  ↳ Property: opMode (String)
  ↳ Property: actParts (Int32)
Security Modes
OPC-UA supports multiple security configurations:
| Mode | Description | Use Case |
|---|---|---|
| None | No encryption, no authentication | Testing, internal networks only |
| Sign | Data is signed (integrity) | Standard security |
| SignAndEncrypt | Data signed and encrypted | High security environments |
Common Security Policies:
- None - No security
- Basic128Rsa15 - Older security standard
- Basic256 - Common standard
- Basic256Sha256 - Modern, recommended standard
Browsing OPC-UA Servers
Before configuring MachineMetrics, you need to browse the OPC-UA server to find relevant data nodes.
Option 1: GUI Client (Recommended for most users)
UaExpert (Free from OPC Foundation):
- Download: opcfoundation.org/products/view/uaexpert
- Windows only (7 or higher)
- Intuitive graphical interface
- Easy browsing of address space
Steps:
- Install UaExpert
- Add new server connection
- Enter endpoint URL:
opc.tcp://[machine-ip]:[port] - Connect (handle certificates if prompted)
- Browse address space to find data nodes
- Note node IDs for relevant data
Option 2: Command Line Client
uals (Python OPC-UA tools):
- Source: github.com/FreeOpcUa/python-opcua
- Cross-platform (Windows, Linux, macOS)
- Prints tree-like structure in plaintext
Usage:
uals -u opc.tcp://[address]:[port] -i [namespace_id] -d [tree_depth]
opcua-commander (Interactive terminal client):
- Source: github.com/node-opcua/opcua-commander
- Requires Node.js
- Interactive browsing capability
Physical Connection
Step 1: Connect Ethernet Cable
- Plug cable into machine's Ethernet port
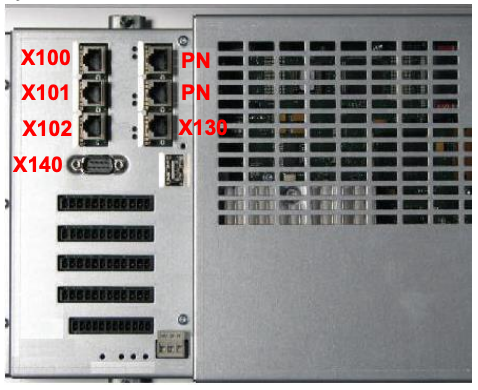
- For Siemens CNC: Typically X130 (company network port)
- For Brother: Standard network port on control
- Verify link lights
🔴 CRITICAL WARNING for Siemens CNC Machines:
- Always check your machine documentation for the correct port address
- Port designation varies by machine tool builder (X130 is common, but not universal)
- These machines have complex internal networks and PROFIBUS
- Connecting to the wrong port can BRICK the machine
- NEVER connect to system network ports (192.168.214.x or 192.168.215.x ranges)
- When in doubt, contact your machine tool builder
Step 2: Configure Network
- Set static IP on machine (recommended)
- Document IP address, subnet, gateway
- Ensure machine and Edge device are on same subnet or properly routed
Step 3: Test Connectivity
- Ping machine IP from Edge or computer
- Verify response
- Check firewall allows OPC-UA port
Enabling OPC-UA on Your Machine
Generic OPC-UA Setup
For machines with OPC-UA capability:
-
Verify License
- Check if OPC-UA option is licensed
- Purchase/install license if needed
- Verify license is activated
-
Enable OPC-UA Server
- Access machine settings/configuration
- Look for OPC-UA, network, or communication settings
- Enable OPC-UA server function
-
Configure Port
- Default: 4840
- Some implementations use different ports
- Note the port for later
-
Set Authentication
- Create username and password (if required)
- Or enable anonymous access (testing only)
- Document credentials
-
Configure Security
- Select security mode (None, Sign, SignAndEncrypt)
- Select security policy (None, Basic256, Basic256Sha256)
- Balance security needs with compatibility
-
Restart/Reboot
- Changes typically require restart
- Follow manufacturer instructions
Siemens 828/840D SL Setup
Prerequisites:
- SINUMERIK Operate installed
- Access MyMachine / OPC UA license (see ordering instructions below)
- Manufacturer access level password
- Static IP from your IT team
Compatibility:
| CNC Software Version | OPC-UA Version Supported |
|---|---|
| 4.5 | V2.2 and V3.0 SP1 |
| 4.07 SP2-SP5 | V2.2 and V3.0 SP1 |
| 4.08 SP2-SP3 | V2.2 and V3.0 SP1 |
| 4.92 and 4.92 HF2 | V3.0 SP1 |
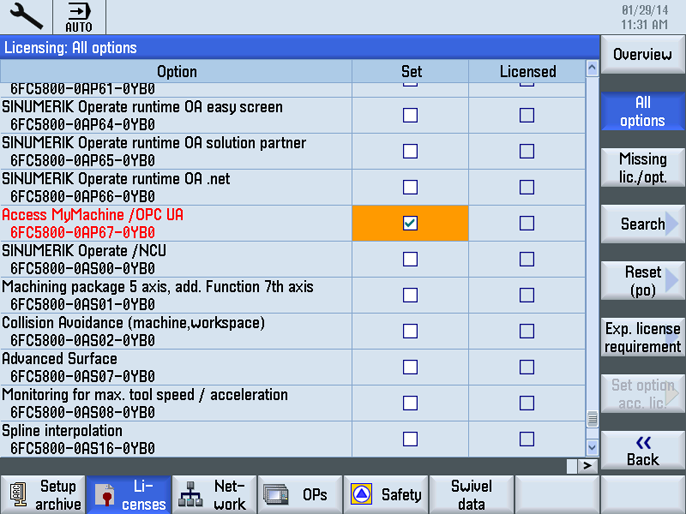
How to Order: Access MyMachine / OPC UA
OPC-UA on Siemens controls is unlocked by purchasing a software option called Access MyMachine / OPC UA directly from Siemens. There are two versions — one for SINUMERIK CNC controls and one for SIMATIC PLCs. Order the correct one based on what you have on the shop floor.
For SINUMERIK CNC Controls (828D / 840D SL)
This is the option for Siemens CNC machining centers, mills, and lathes running SINUMERIK Operate.
| Product | Access MyMachine / OPC UA for SINUMERIK 828D / 840D SL |
| Part Number | 6FC5800-0AP67-0YBO |
| Price | $646.00 USD (one-time license, as of March 2026) |
| Purchase | Buy on Siemens DEX |
| Industry Mall | View on Siemens Industry Mall |
What it does: Activates an OPC UA server inside the SINUMERIK control that allows MachineMetrics to read machine state, programs, spindle data, alarms, and PLC tags over the network using a standardized protocol.
How to purchase:
- Go to Siemens DEX or the Siemens Industry Mall
- Create or log in to your Siemens account
- Add to cart and complete purchase — the license is delivered digitally via the Siemens Web License Manager (WLM)
- You will receive a license key that is activated on the control in Step 2 below
For SIMATIC PLC Controls (S7-1500 and compatible)
This is the option for standalone Siemens SIMATIC PLC-controlled machines (not SINUMERIK CNC). OPC UA server functionality is built into S7-1500 CPUs running firmware V2.0 or later and is enabled through TIA Portal — no separate Access MyMachine purchase is required for most S7-1500 CPUs.
What to do: In TIA Portal, open your CPU properties, navigate to Protection & Security → OPC UA, and enable the OPC UA server. Consult your Siemens distributor or the Siemens Industry Mall if your CPU requires a separate OPC UA license (older or smaller CPU variants).
Step 1: Enable Manufacturer Access
- Select Startup area (🔧 Setup icon)
- Press Password → Set password
- Enter manufacturer password:
SUNRISE - Press OK
- Status bar should show: "Access level: Manufacturer"
Note: If rejected, the OEM may have changed the default password. Contact machine builder.
Step 2: Set License
No license yet? See the ordering instructions above — purchase Access MyMachine / OPC UA from Siemens and receive a key via the Web License Manager before continuing.
- Go to Startup
- Press Licenses soft key
- Navigate to Access MyMachine / OPC UA
- Check the box under Set
- If the license is not listed, enter the license key received from Siemens WLM
Step 3: Set Company Network IP (X130 Port)
🔴 CRITICAL WARNING:
- X130 is the most common port, but always verify with your machine documentation
- Different machine tool builders use different port designations
- These machines have complex internal networks and PROFIBUS
- Connecting to the wrong port can BRICK your machine
- NEVER modify system network (192.168.214.x or 192.168.215.x ranges)
- When in doubt, contact your machine tool builder before proceeding
- Select Diagnostics
- Press menu forward key → Choose Bus TCP/IP
- Select TCP/IP diagnostics → TCP/IP config
- Select interface X130 (or your machine's designated company network port - verify in documentation)
- Press Change
- Set Address Type = Manual (for static IP)
- Enter network settings:
- IP Address: Assigned by IT team
- Subnet Mask: From IT team
- Gateway: Only if needed for routing outside subnet
- Press OK
- Restart the control (mandatory for changes to take effect)
Physical Port Location:
- On SINUMERIK 828D: Typically rear-panel Ethernet port labeled X130
- Verify port designation in your machine documentation
- Use shielded CAT5e/CAT6 cable
- Connect directly to company network switch

Step 4: Configure OPC-UA Server
-
In Startup area, navigate to: Network → OPC UA → Setting → Change
-
Connection Settings:
- Verify Company network is selected
- Confirm IP address (your Company IP)
- TCP Port:
4840(default, leave unchanged)
-
Authentication:
- Admin User: Create username (e.g.,
OpcUaClient) - Password: Set secure password (needed for MachineMetrics connection)
- Allow anonymous access: Uncheck (for security)
- Accept certificates automatically: Check only for initial testing
- Admin User: Create username (e.g.,
-
Activation:
- Check Activate OPC UA
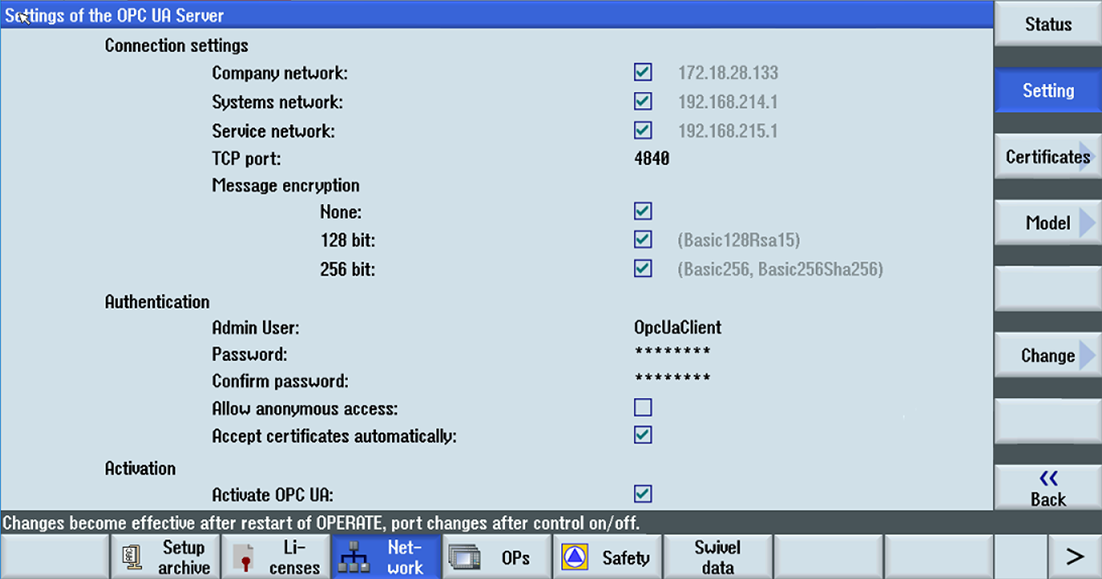
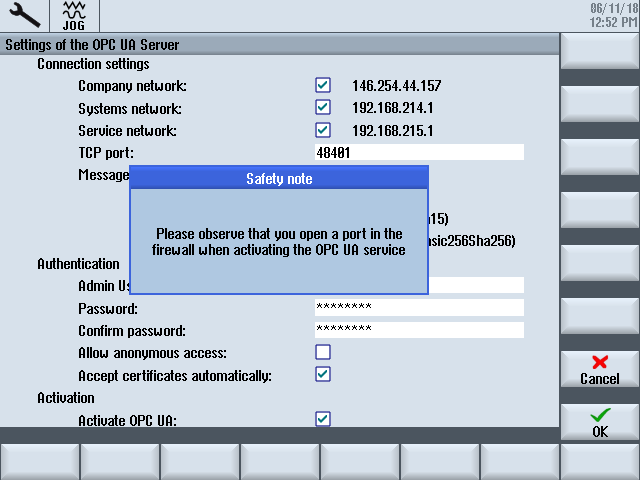
- Press OK → Save PCU settings
- Restart OPERATE for changes to take effect
Step 5: Verify Connectivity
- From PC on same network:
ping [machine-ip] - In Startup → Network → OPC UA → Status
- Confirm server lists Company IP (e.g.,
10.1.0.46:4840) - Should show Status: OK
Step 6: Accept Certificates
When MachineMetrics Edge first connects:
- Go to Startup → Network → OPC UA → Certificates
- Under "Pending Certificates", select the client certificate
- Press Accept
- Status page should show connected clients
Step 7: Return to Normal Access Level
- Go to Startup → Password → Set password
- Press Cancel or enter user-level password
- Status bar should return to "Access level: User"
Additional Resources:
Brother D-Series Setup
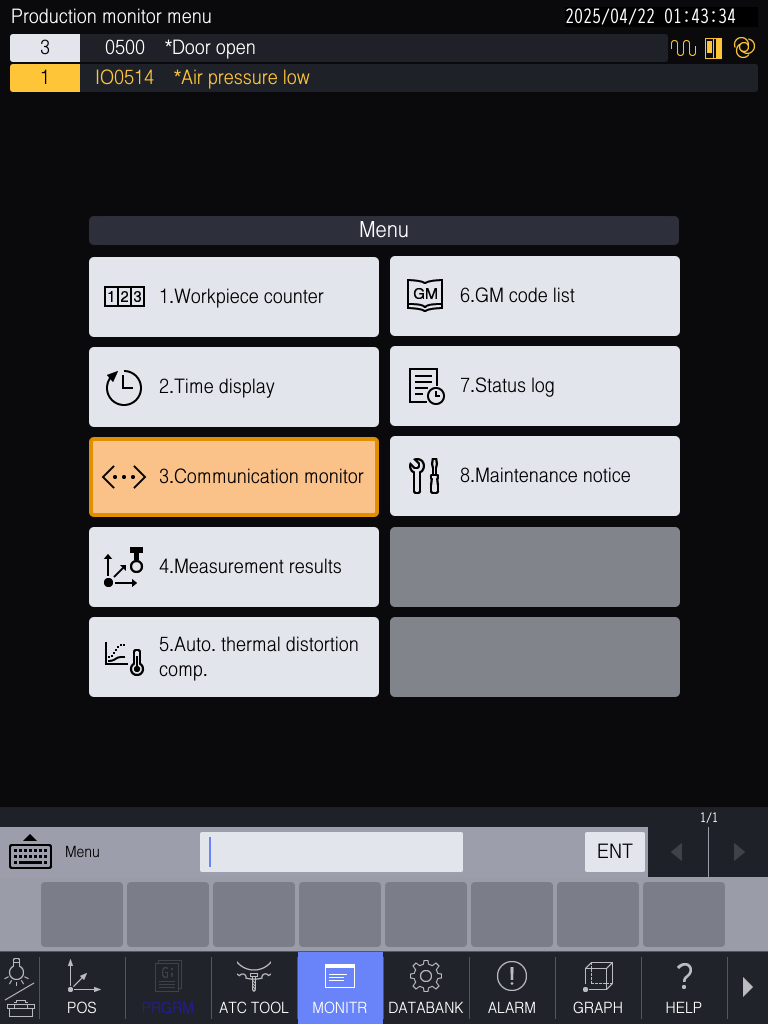
Step 1: Access Communication Menu
- From main screen, press DATABANK soft key
- Select 7. Communication parameter
- Navigate to Ethernet/FTP settings
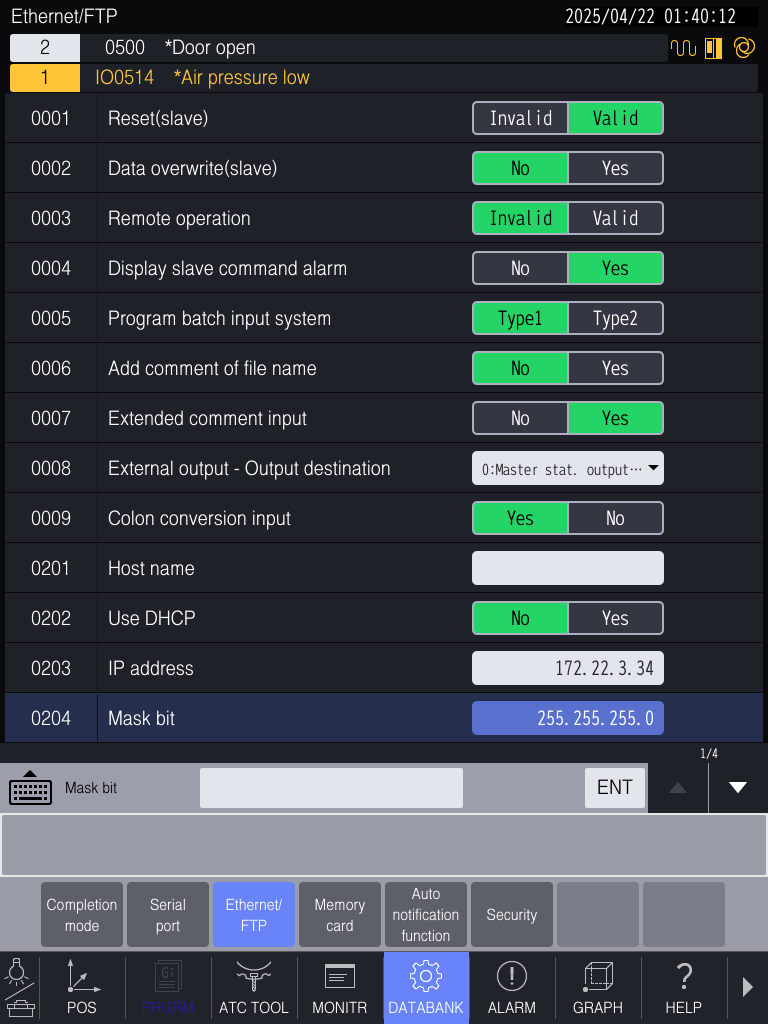
Step 2: Configure Static IP
⚠️ Important: Brother controls use special numeric format for IP addresses.
- 0202 - Use DHCP → Set to
No - 0203 - IP address → Enter IP as 12-digit number
- Standard format:
172.22.3.34 - Brother format:
172022003034(no dots!) - Pad each octet to 3 digits
- Standard format:
- 0204 - Mask bit → Typically
255.255.255.0
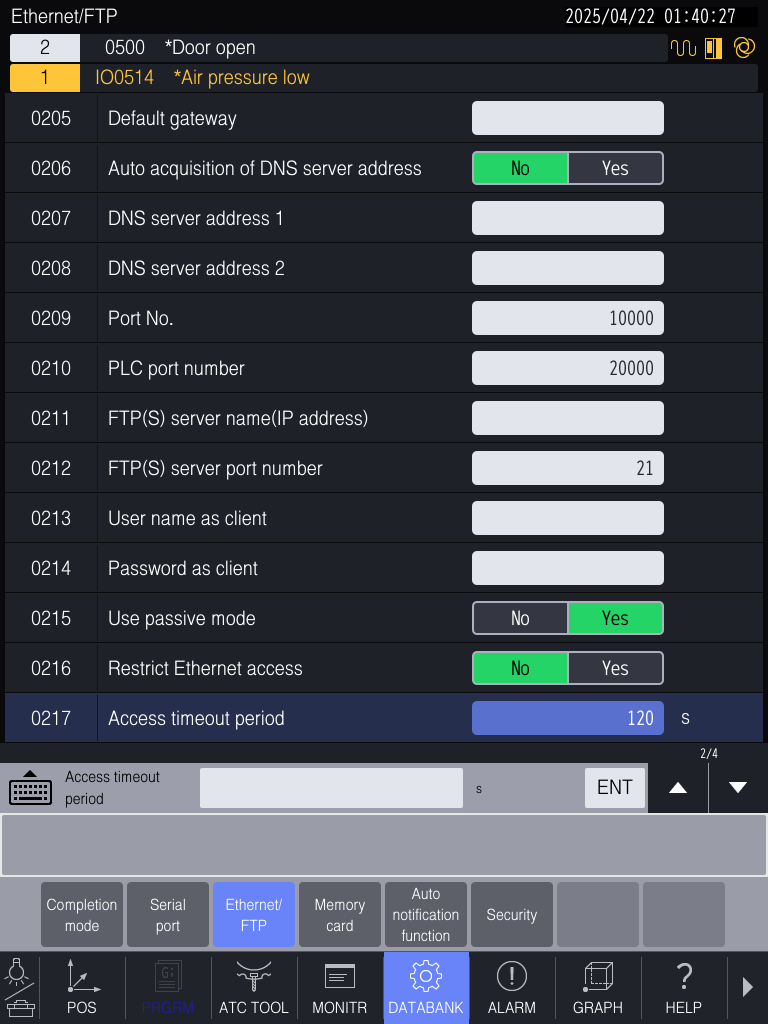
Step 3: Configure Network Access
- 0004 - Display slave command alarm → Set to
No - 0216 - Restrict Ethernet access → Set to
No
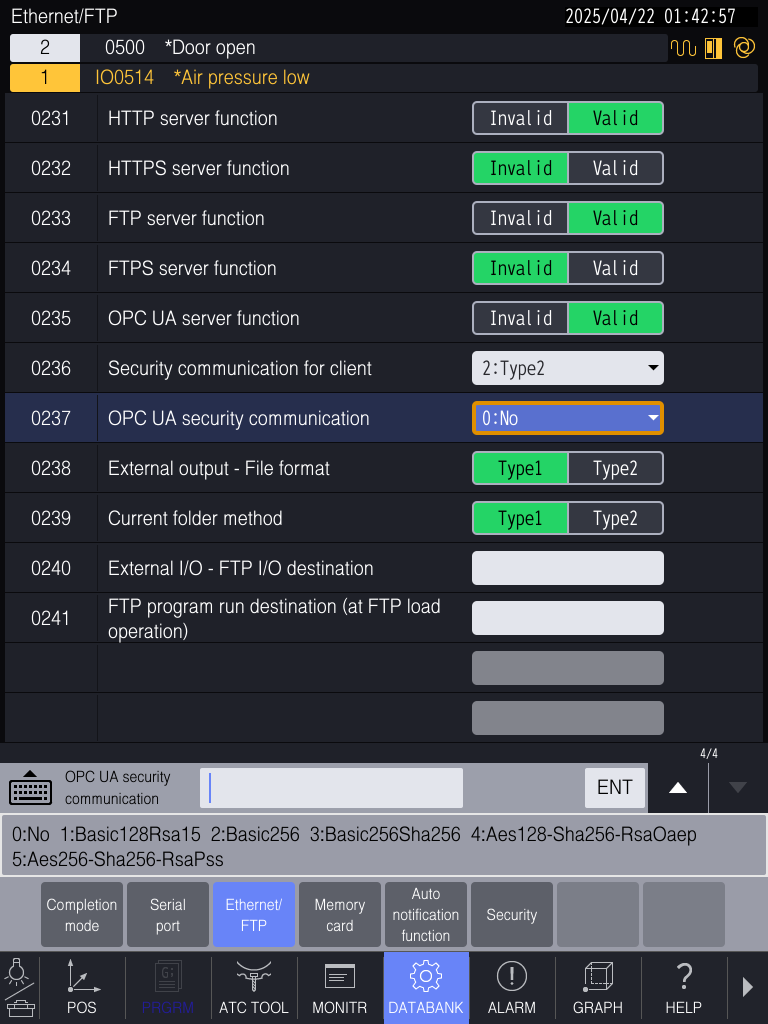
Step 4: Enable OPC-UA
Navigate to final Ethernet/FTP menu screen:
- 0235 - OPC UA server function → Set to
Valid - 0236 - Security communication for client → Set to
2: Type2 - 0237 - OPC UA security communication → Set security level:
0: No- No username/password (simplest)1-5- RSA/AES encryption with authentication
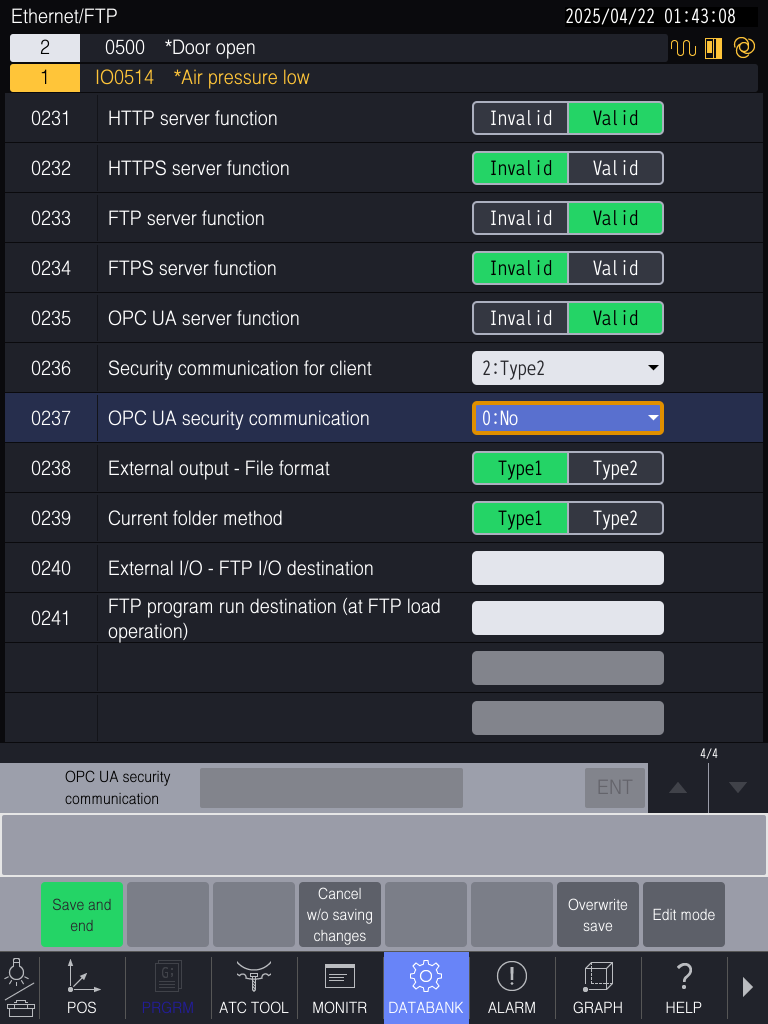
Step 5: Save Settings
- Press Save and end (bottom left)
- Or use Overwrite save to continue editing
⚠️ Critical: If you don't save, all changes are lost on shutdown/reboot.
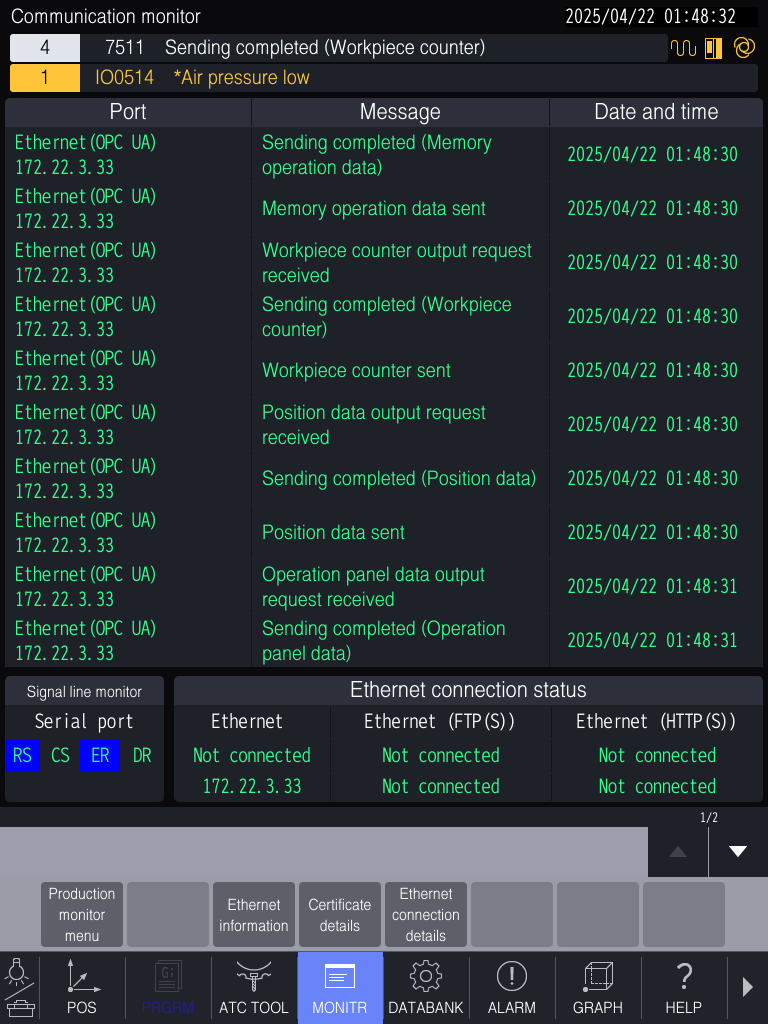
Step 6: Verify Connectivity
- Press MONITR soft key
- Select 3. Communication monitor
- Look for
Ethernet (OPC UA)in Port column - Message column should show:
Sending completedData sentOutput request received
Step 7: Check Ethernet Information
- In MONITR menu, select Ethernet information
- Verify displays:
- IP Address (as configured)
- Subnet Mask
- Gateway
- MAC Address
- DHCP status
Connection String for MachineMetrics:
opc.tcp://[ip-address]:4840
Example: opc.tcp://10.103.112.62:4840

Sample Script: Brother OPC-UA Sample
Bystronic Setup
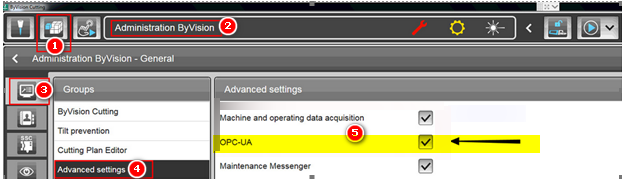
Step 1: Enable OPC-UA
- Navigate to Modules → Administration → Advanced Settings
- Find OPC-UA setting
- Enable OPC-UA server
Step 2: Open Firewall Ports
Port 56000 (both TCP and UDP) must be open on both:
- Brake panel PC
- Server
Note: For network-level firewall configuration and Edge device requirements, see the Network Requirements Guide.
Creating Firewall Rules:
For TCP Port:
- Open Control Panel on machine/server
- System and Security → Windows Defender Firewall
- Advanced Settings → Inbound Rules
- Actions (right side) → New Rule
- Select Port → Next
- Select TCP → Enter
56000for Specific Local Port → Next - Select Allow the connection → Next
- Select Domain, Private, Public → Next
- Enter name:
Bystronic56000TCPPort→ Finish
For UDP Port:
- Actions → New Rule
- Select Port → Next
- Select UDP → Enter
56000→ Next - Allow the connection → Next
- Select all profiles → Next
- Enter name:
Bystronic56000UDPPort→ Finish
Step 3: Reboot
Reboot the entire machine (not just the PC) for changes to take effect.
Connection Port: 56000
Okuma OSP-P500 Setup
Protocol: OPC-UA | Default Port: 4840 | Endpoint: opc.tcp://<machine_ip>:4840
The OPC UA for Machine Tools option must be licensed and enabled on the machine. This is a separate Okuma option from MTConnect — confirm with your Okuma dealer before starting.
Prerequisites:
- Ethernet cable connected from the machine control to the customer's network
- Network IP address or DHCP information from the customer's IT team
- OPC UA for Machine Tools option licensed on the control
Step 1: Access the CNC Screen
From the machine homepage (OSP Suite), press CNC in the lower-left Operation panel to open the conventional CNC operation screen.
Step 2: Open Admin Launcher
- On the CNC screen, locate the puzzle piece icon in the lower-right sidebar
- Tap it to open the utility menu
- Tap the gear icon (⚙) to open settings
- Select Admin Launcher
Step 3: Configure the Network / IP Address
If you have already configured the IP address for MTConnect or another protocol, skip this step.
- In the Admin Launcher, select Network Options (item 4)
- Select the Network Interface
- Configure the IP address in the Windows TCP/IP Settings page:
- DHCP: Select "Obtain an IP address automatically"
- Static IP: Enter the IP address, subnet mask, and default gateway from the customer's IT team
- Click OK and close the network settings
Step 4: Verify Firewall Settings
The OSP-P500 has a built-in firewall (OSP-FIREWALL) that must have OPC UA enabled before the connection will work.
- In the Admin Launcher, select Firewall Settings (item 6)
- The OSP-FIREWALL screen will open showing the protocol rules list
- Confirm OPC UA (TCP, port 4840) is checked/enabled
- If it is not enabled, check the box and press Apply
- Press Quit to close
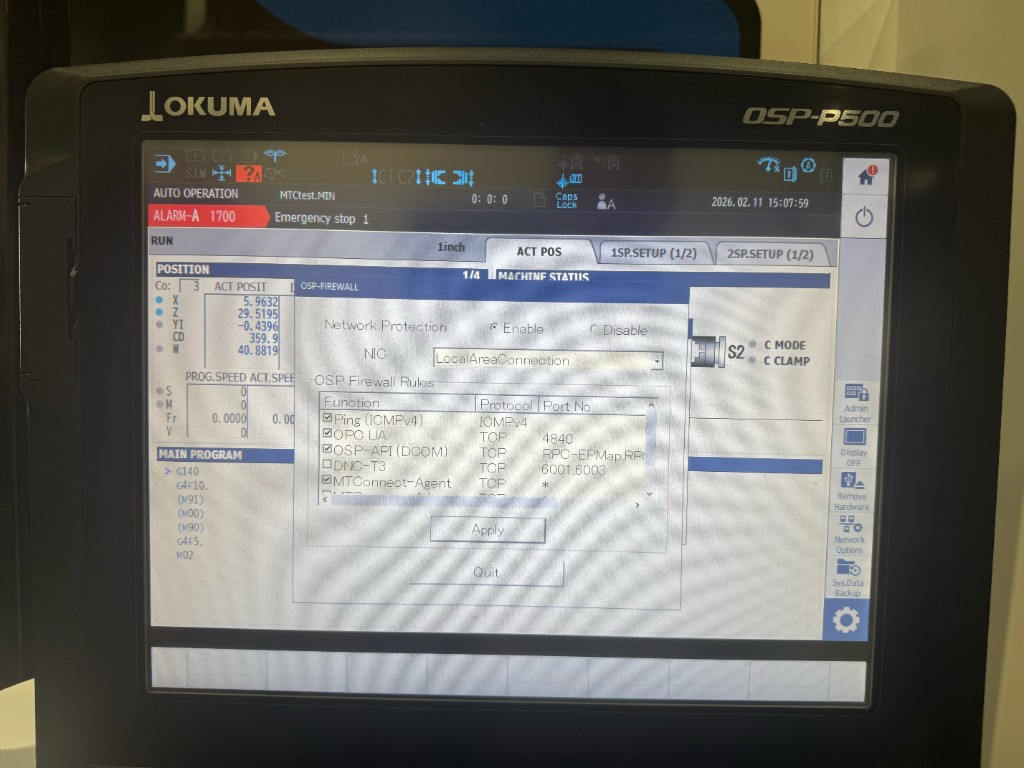
The firewall screen also shows MTConnect-Agent as a separate rule. If you are setting up MTConnect on the same machine, ensure that rule is also enabled.
Step 5: Open OPC-UA Configuration
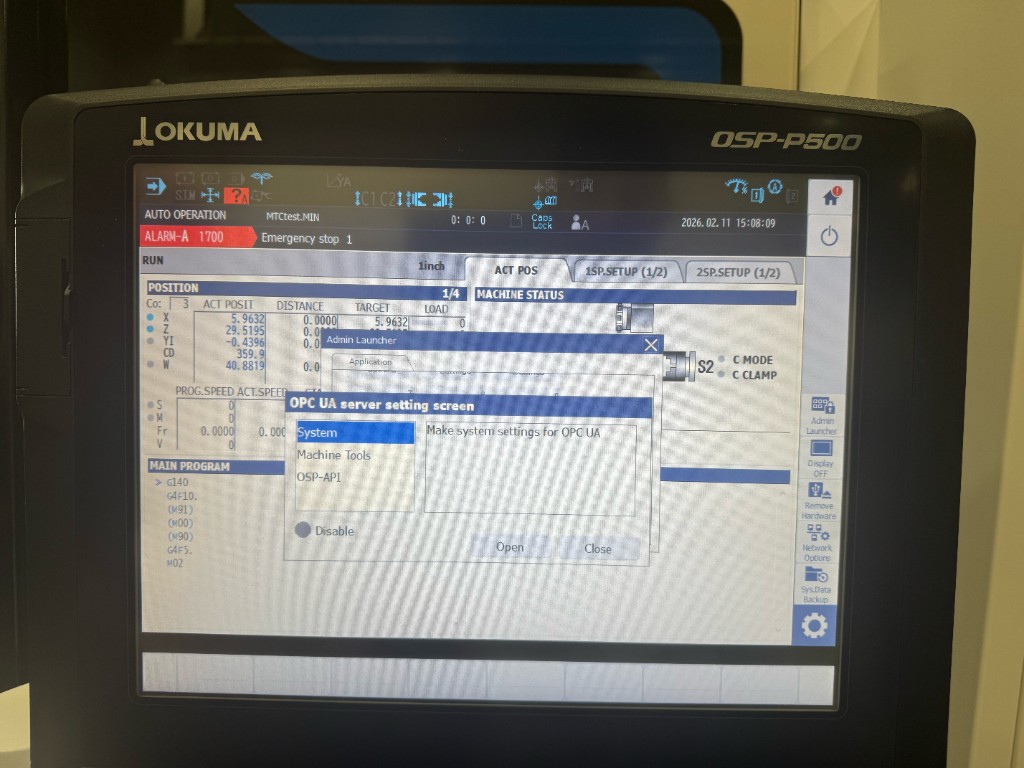
- In the Admin Launcher, scroll to item #11 — OPC UA
- Select System
- Press Open
The OPC-UA configuration interface will launch with four sections in the left sidebar: Application, User Settings, Certif. Settings, and Security Settings.
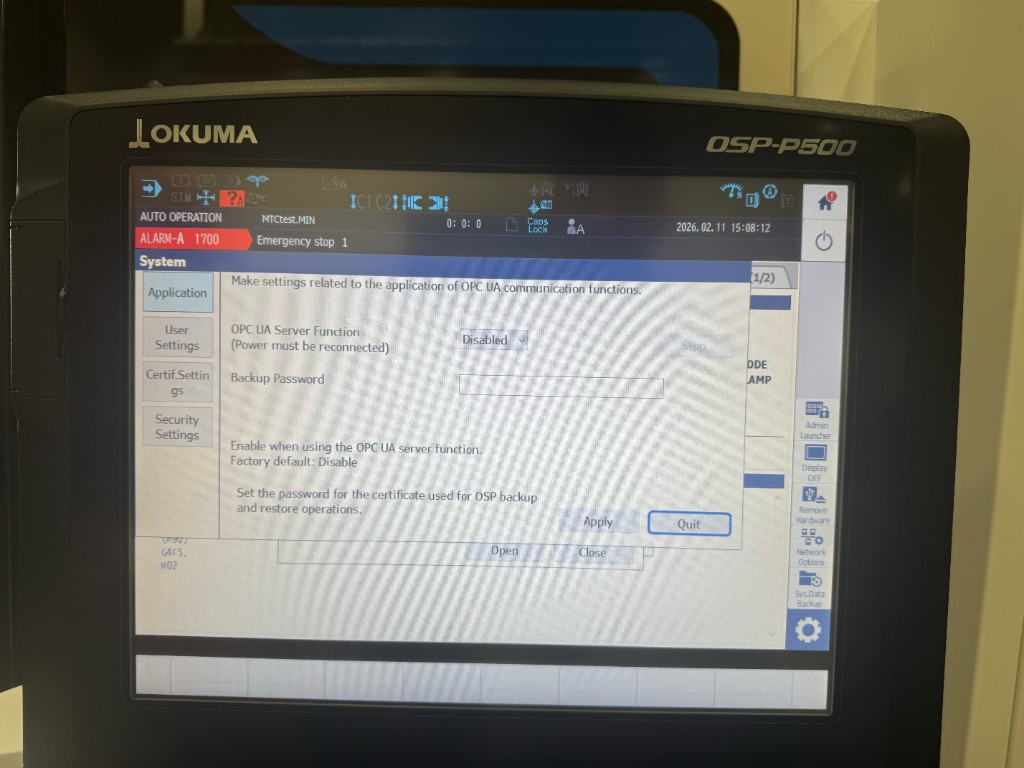
Step 6: Enable the OPC-UA Function
- Select Application in the left sidebar
- Locate the OPC UA Server Function dropdown
- Change the value from Disabled to Enabled
- Press Apply
Step 7: Configure User Settings
- Select User Settings in the left sidebar
- In the User Management tab, click Add to create a new user
- Assign the appropriate role (Observer, Operator, Engineer, Supervisor, Configure, Admin, or Security)
- Set the username and password for the OPC-UA client
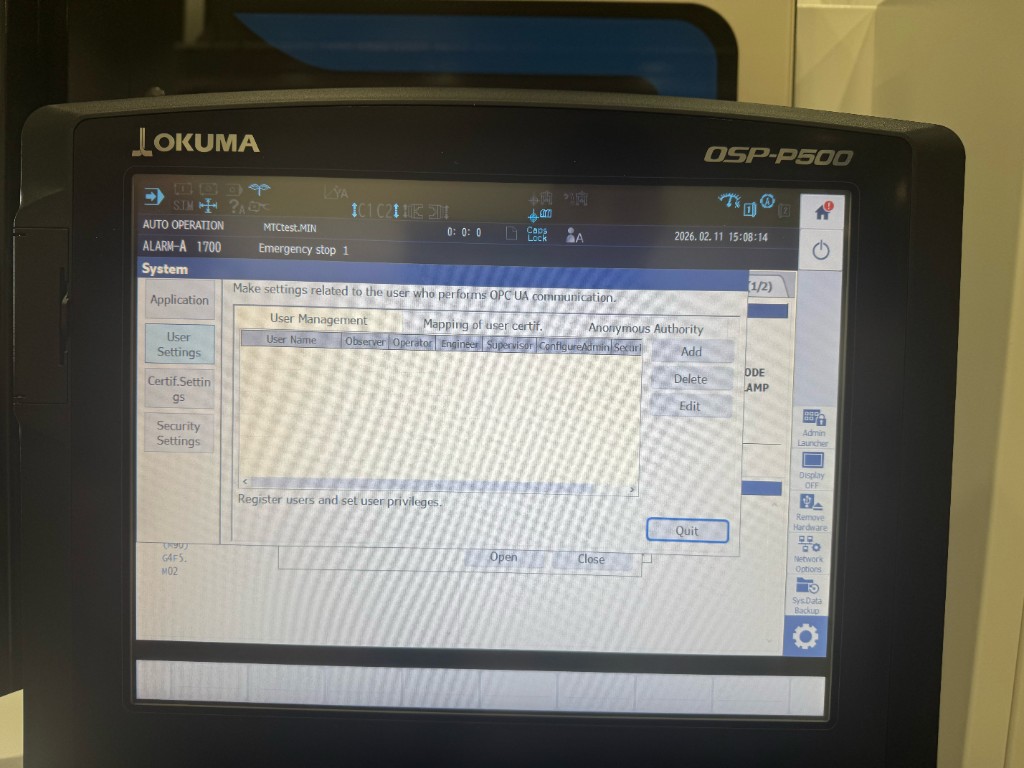
These credentials are entered in the MachineMetrics adapter script under the username and password fields — see the Sample Configurations section for an example:
username: OpcUaClient
password: YourSecurePassword
Step 8: Configure Certificate Settings
- Navigate to Certificate Settings
- Authorize (trust) the certificate for this machine
- When an OPC-UA client connects for the first time, its certificate must be trusted here
- For initial testing, you may configure automatic certificate acceptance
- For production, manually trust specific client certificates
Step 9: Configure Security Settings
- Navigate to Security Settings
- Set the Security Mode:
| Mode | Use Case |
|---|---|
None | Testing only — not recommended for production |
Sign | Messages signed but not encrypted |
SignAndEncrypt | Recommended for production |
- Set the Security Policy (e.g.,
Basic256Sha256)
The security mode and policy set here must match what is configured in the MachineMetrics OPC-UA adapter script.
Step 10: Apply and Restart
- Click Apply to save all configuration changes
- Restart the control for OPC-UA to become active
Verification
- From a PC on the same network, open an OPC-UA client (e.g., UaExpert, Prosys OPC UA Browser)
- Connect to:
opc.tcp://<machine_ip>:4840 - Enter the username and password configured in Step 7 (User Settings)
- If prompted to trust the server certificate, accept it
- Browse the address space — you should see CNC data nodes
If connection fails:
- Confirm OPC-UA was enabled, Apply was clicked, and the control was restarted
- Check that Windows Firewall allows inbound traffic on port 4840
- Verify the security mode/policy in your client matches the machine configuration
- Confirm network connectivity between the client and the machine
Quick Reference — OSP-P500 OPC-UA
| Item | Value |
|---|---|
| Protocol | OPC-UA |
| Default Port | 4840 |
| Endpoint Format | opc.tcp://<ip>:4840 |
| Admin Launcher Path | CNC → Puzzle Icon → Gear → Admin Launcher |
| OPC-UA Config Path | Admin Launcher → Item #11 (OPC UA) → System → Open |
| Critical Steps | Enable OPC Function → Configure Users → Apply → Restart Control |
| Security Recommendation | SignAndEncrypt / Basic256Sha256 |
Trumpf Setup
Trumpf machine tools (TruLaser, TruBend, TruPunch, etc.) use a proxy-based OPC-UA architecture. The MachineMetrics edge device does not connect directly to the machine — it connects to a customer-hosted OPC UA Proxy software component, which in turn communicates with the machines.
MachineMetrics Edge  →  OPC UA Proxy (customer server)  →  Trumpf Machine(s)
                   port 11878 (client-facing)   port 12120 (machine-facing)
Unlike standard OPC-UA connections, the MachineMetrics adapter endpoint must point at the proxy server's hostname on port 11878, not the machine's IP address. Connecting to the machine IP directly will not work.
Prerequisites
All three of the following must be in place before MachineMetrics can connect.
1. OPC-UA Interface Licensed on the Machine
The OPC-UA interface is a paid machine option that must be licensed per machine.
- On machines connected to Trumpf's TelePresence Portal, licensing is applied automatically after purchase
- On older or offline machines, a Trumpf service technician may need to activate it on-site
To verify: have the customer contact their Trumpf sales or service representative, or check via MyTRUMPF.
Trumpf offers an Extension Cube hardware retrofit for machines without a built-in OPC-UA server. This requires the Remote Control Interface function on the legacy machine. Confirm with Trumpf before scoping connectivity.
2. OPC UA Proxy Software Installed
The customer must install the Trumpf OPC UA Proxy on a Windows machine in their production network. This is a customer responsibility — MachineMetrics cannot install or configure the Proxy.
Download: Available via MyTRUMPF. Customer must be registered (allow 2–3 business days). If no MyTRUMPF access, the installation package can be requested from the local Trumpf sales and service company.
System requirements:
- Windows 10, 11, Server 2016, 2019, or 2022
- .NET Framework 4.8 or higher
- Stable hostname recommended — avoid using IP addresses as machine identifiers (entries are case-sensitive)
Firewall: Installation automatically adds Windows firewall rules for ports 12120 and 11878. If connection issues arise, verify these rules are active and not overridden by a network-level firewall.
To activate the OPC-UA interface on the machine: Contact TRUMPF Technical Service (US: 1-888-878-6737).
3. Each Machine Pointed at the Proxy
On each Trumpf machine, the Proxy address must be configured in the machine's network settings:
- Open the TRUMPF Operating Shell (TOSh)
- Select Machine Configuration → Machine Connectivity
- If a Smart Factory Host is present: go to the Configure SFH tab → Add Host
- Otherwise: go to the OPC UA tab → Add custom connection, and enter:
opc.tcp://<proxy_server_hostname>:12120 - Press Apply changes — the machine's OPC UA server (MOS) will restart
- Confirm the status shows Reachable (green)
Connecting MachineMetrics
Once the Proxy is installed and machines show Connected in the Proxy Configuration Tool, configure the MachineMetrics adapter with the Proxy endpoint:
opc.tcp://<proxy_server_hostname>:11878
Use the proxy server's hostname, not the individual machine IP.
Security Configuration and Certificate Acceptance
Trumpf OPC UA Proxy v2.x and above enforces authenticated, encrypted connections. The MachineMetrics adapter script is pre-configured with the required security settings — no changes needed.
When the MachineMetrics edge first connects, the Proxy receives the adapter's certificate and holds it in Rejected status. A Trumpf-side administrator must complete this one-time step:
- Open the TRUMPF OPC UA Proxy Configuration Tool
- Navigate to the Client Management tab
- Locate the MachineMetrics entry (status: Rejected)
- Click Accept
The connection will establish immediately. This step is required once per edge device.
Adapter Script
Copy and paste the following script into the MachineMetrics adapter configuration. Update the endpoint URL to point at your OPC UA Proxy server before saving.
version: 2
security-policy: Basic256Sha256
security-mode: SignAndEncrypt

tags:
  # ProductionPlan (ID 2)
  ProductionPlanRunning:
    path: ns=17;s=4

  # ProductionPlan > CurrentProgram (ID 7)
  ProgramName:
    path: ns=17;s=8
  StationNumber:
    path: ns=17;s=10
  NumberInProductionPlan:
    path: ns=17;s=11
  TargetQuantity:
    path: ns=17;s=12
  CurrentQuantity:
    path: ns=17;s=13
  ProductionOrderIdentifier:
    path: ns=17;s=14
  ProductionPackageName:
    path: ns=17;s=15
  BatchNumber:
    path: ns=17;s=16
  ProgramRunning:
    path: ns=17;s=17.Running
  ProgramStopped:
    path: ns=17;s=17.Stopped
  ProgramAborted:
    path: ns=17;s=17.Aborted
  ProductionPlanCurrentProgramEnded:
    path: ns=17;s=17.Ended
  ProgramStoppedMalfunction:
    path: ns=17;s=17.StoppedMalfunction
  ProgramStoppedOperator:
    path: ns=17;s=17.StoppedOperator
  ProgramReentry:
    path: ns=17;s=17.Reentry

  # ProductionPlan > CurrentProgram > Time (ID 25)
  GrossRunTime:
    path: ns=17;s=25.GrossRunTime
  NetRunTime:
    path: ns=17;s=25.NetRunTime
  NetProcessingTime:
    path: ns=17;s=25.NetProcessingTime
  PlanNetProcessingTime:
    path: ns=17;s=25.NetProcessingTime
  EstimatedProgramEndTime:
    path: ns=17;s=25.EstimatedProgramEndTime

  # ProductionPlan > Time (ID 394)
  EstimatedProductionPlanEndTime:
    path: ns=17;s=395

  # Machine (ID 30)
  FeedrateOverride:
    path: ns=17;s=33

  # Machine > PartProgram (ID 31)
  PartProgramName:
    path: ns=17;s=32
  PartStationNumber:
    path: ns=17;s=34
  Running:
    path: ns=17;s=35.Running
  PartProgramRunning:
    path: ns=17;s=35.Running
  Stopped:
    path: ns=17;s=35.Stopped
  PartProgramStopped:
    path: ns=17;s=35.Stopped
  Aborted:
    path: ns=17;s=35.Aborted
  PartProgramAborted:
    path: ns=17;s=35.Aborted
  Ended:
    path: ns=17;s=35.Ended
  CurrentPartProgramEnded:
    path: ns=17;s=35.Ended
  StoppedMalfunction:
    path: ns=17;s=35.StoppedMalfunction
  StoppedOperator:
    path: ns=17;s=35.StoppedOperator
  PartProgramStoppedOperator:
    path: ns=17;s=35.StoppedOperator
  PartProgramReentry:
    path: ns=17;s=35.Reentry
  UserMessage:
    path: ns=17;s=150

  # Machine > PartProgram > Time (ID 43)
  PartGrossRunTime:
    path: ns=17;s=43.GrossRunTime
  PartNetRunTime:
    path: ns=17;s=43.NetRunTime
  PartNetProcessingTime:
    path: ns=17;s=43.NetProcessingTime
  PartEstimatedProgramEndTime:
    path: ns=17;s=43.EstimatedProgramEndTime

  # Machine > PartProgram > Time32 (ID 241)
  PreEstimatedProgramRunTime:
    path: ns=17;s=415

  # Machine > Machine State Signals (ID 50-56)
  DrivesStartingUp:
    path: ns=17;s=50
  DrivesSwitchedOn:
    path: ns=17;s=51
  HomedAndReadyForUse:
    path: ns=17;s=52
  ReadyForUse:
    path: ns=17;s=61
  MachineActive:
    path: ns=17;s=53
  MachineInterrupted:
    path: ns=17;s=54
  DrivesShuttingDown:
    path: ns=17;s=55
  DrivesSwitchedOff:
    path: ns=17;s=56
  SystemShutdownActive:
    path: ns=17;s=434

  # Machine > LaserTechnology > Laser1 (ID 57, 208)
  NetBeamOnTime:
    path: ns=17;s=59
  LaserEmissionOn:
    path: ns=17;s=435

  # Machine > OperatingMode (ID 62)
  AutoMode:
    path: ns=17;s=64
  JogMode:
    path: ns=17;s=65
  MdaMode:
    path: ns=17;s=66

  # Machine > StopConditions (ID 67)
  EmergencyStop:
    path: ns=17;s=69
  FeedHold:
    path: ns=17;s=70

  # Machine > SafetyDevices (ID 71)
  LightBarrier1:
    path: ns=17;s=73
  LightBarrier2:
    path: ns=17;s=74
  LightBarrier3:
    path: ns=17;s=75
  LightBarrier4:
    path: ns=17;s=76
  LightBarrier5:
    path: ns=17;s=77
  SafetyDoor1:
    path: ns=17;s=78
  SafetyDoor2:
    path: ns=17;s=79
  SafetyDoor3:
    path: ns=17;s=80
  SafetyDoor4:
    path: ns=17;s=81
  SafetyDoor5:
    path: ns=17;s=82
  EmergencyStopAutomation1:
    path: ns=17;s=83
  EmergencyStopAutomation2:
    path: ns=17;s=84
  EmergencyStopAutomation3:
    path: ns=17;s=85
  EmergencyStopAutomation4:
    path: ns=17;s=86
  EmergencyStopAutomation5:
    path: ns=17;s=87
  EmergencyStopStartPillar1:
    path: ns=17;s=88
  EmergencyStopStartPillar2:
    path: ns=17;s=89
  EmergencyStopStartPillar3:
    path: ns=17;s=90
  EmergencyStopStartPillar4:
    path: ns=17;s=91
  EmergencyStopStartPillar5:
    path: ns=17;s=92
  EmergencyStopControlPanel1:
    path: ns=17;s=93
  EmergencyStopControlPanel2:
    path: ns=17;s=94
  EmergencyStopControlPanel3:
    path: ns=17;s=95
  EmergencyStopControlPanel4:
    path: ns=17;s=96

  # Machine > MessagesOnHold (ID 97)
  MessagesOnHold:
    path: ns=17;s=97

  # Machine > MessageList (ID 98)
  MessageList:
    path: ns=17;s=98

  # Machine > Messages (ID 179)
  MachineMessages:
    path: ns=17;s=179

variables:
  execution:
    - state:
      - ACTIVE: Running == "true"
      - FEED_HOLD: FeedHold == "true"
      - INTERRUPTED: EmergencyStop == "true" or StoppedOperator == "true"
      - PROGRAM_STOPPED: Stopped == "true"
      - STOPPED: StoppedMalfunction == "true" or Aborted == "true"
      - PROGRAM_COMPLETED: Ended == "true" and Running == "false"
      - READY: true

  part-count:
    - source: CurrentPartProgramEnded
    - rising-edge:
    - count

  controller-mode:
    - state:
      - AUTOMATIC: AutoMode == "true"
      - MANUAL_DATA_INPUT: MdaMode == "true"
      - MANUAL: JogMode == "true"

  machine-state:
    - state:
      - STARTING_UP: DrivesStartingUp == "true"
      - POWERING_ON: DrivesSwitchedOn == "true"
      - READY: HomedAndReadyForUse == "true"
      - ACTIVE: MachineActive == "true"
      - INTERRUPTED: MachineInterrupted == "true"
      - SHUTTING_DOWN: DrivesShuttingDown == "true"
      - POWERED_OFF: DrivesSwitchedOff == "true"

  laser-status:
    - state:
      - ON: LaserEmissionOn == "true"
      - OFF: true

conditions:
  estop:
    - code: ESTOP_MAIN
      message: Emergency Stop Active
      value:
        FAULT: EmergencyStop == "true"
    - code: ESTOP_AUTOMATION_1
      message: Emergency Stop Automation 1
      value:
        FAULT: EmergencyStopAutomation1 == "true"
    - code: ESTOP_AUTOMATION_2
      message: Emergency Stop Automation 2
      value:
        FAULT: EmergencyStopAutomation2 == "true"
    - code: ESTOP_AUTOMATION_3
      message: Emergency Stop Automation 3
      value:
        FAULT: EmergencyStopAutomation3 == "true"
    - code: ESTOP_AUTOMATION_4
      message: Emergency Stop Automation 4
      value:
        FAULT: EmergencyStopAutomation4 == "true"
    - code: ESTOP_AUTOMATION_5
      message: Emergency Stop Automation 5
      value:
        FAULT: EmergencyStopAutomation5 == "true"
    - code: ESTOP_START_PILLAR_1
      message: Emergency Stop Start Pillar 1
      value:
        FAULT: EmergencyStopStartPillar1 == "true"
    - code: ESTOP_START_PILLAR_2
      message: Emergency Stop Start Pillar 2
      value:
        FAULT: EmergencyStopStartPillar2 == "true"
    - code: ESTOP_START_PILLAR_3
      message: Emergency Stop Start Pillar 3
      value:
        FAULT: EmergencyStopStartPillar3 == "true"
    - code: ESTOP_START_PILLAR_4
      message: Emergency Stop Start Pillar 4
      value:
        FAULT: EmergencyStopStartPillar4 == "true"
    - code: ESTOP_START_PILLAR_5
      message: Emergency Stop Start Pillar 5
      value:
        FAULT: EmergencyStopStartPillar5 == "true"
    - code: ESTOP_CONTROL_PANEL_1
      message: Emergency Stop Control Panel 1
      value:
        FAULT: EmergencyStopControlPanel1 == "true"
    - code: ESTOP_CONTROL_PANEL_2
      message: Emergency Stop Control Panel 2
      value:
        FAULT: EmergencyStopControlPanel2 == "true"
    - code: ESTOP_CONTROL_PANEL_3
      message: Emergency Stop Control Panel 3
      value:
        FAULT: EmergencyStopControlPanel3 == "true"
    - code: ESTOP_CONTROL_PANEL_4
      message: Emergency Stop Control Panel 4
      value:
        FAULT: EmergencyStopControlPanel4 == "true"

  light-barrier:
    - code: LIGHT_BARRIER_1
      message: Light Barrier 1 Interrupted
      value:
        WARNING: LightBarrier1 == "true"
    - code: LIGHT_BARRIER_2
      message: Light Barrier 2 Interrupted
      value:
        WARNING: LightBarrier2 == "true"
    - code: LIGHT_BARRIER_3
      message: Light Barrier 3 Interrupted
      value:
        WARNING: LightBarrier3 == "true"
    - code: LIGHT_BARRIER_4
      message: Light Barrier 4 Interrupted
      value:
        WARNING: LightBarrier4 == "true"
    - code: LIGHT_BARRIER_5
      message: Light Barrier 5 Interrupted
      value:
        WARNING: LightBarrier5 == "true"

  safety-door:
    - code: SAFETY_DOOR_1
      message: Safety Door 1 Open
      value:
        WARNING: SafetyDoor1 == "true"
    - code: SAFETY_DOOR_2
      message: Safety Door 2 Open
      value:
        WARNING: SafetyDoor2 == "true"
    - code: SAFETY_DOOR_3
      message: Safety Door 3 Open
      value:
        WARNING: SafetyDoor3 == "true"
    - code: SAFETY_DOOR_4
      message: Safety Door 4 Open
      value:
        WARNING: SafetyDoor4 == "true"
    - code: SAFETY_DOOR_5
      message: Safety Door 5 Open
      value:
        WARNING: SafetyDoor5 == "true"

data-items:
  - execution
  - part-count
  - controller-mode
  - machine-state
  - laser-status
  - ProductionPlanRunning
  - ProgramName
  - StationNumber
  - NumberInProductionPlan
  - TargetQuantity
  - CurrentQuantity
  - ProductionOrderIdentifier
  - ProductionPackageName
  - BatchNumber
  - ProgramRunning
  - ProgramStopped
  - ProgramAborted
  - ProductionPlanCurrentProgramEnded
  - ProgramStoppedMalfunction
  - ProgramStoppedOperator
  - ProgramReentry
  - GrossRunTime
  - NetRunTime
  - NetProcessingTime
  - PlanNetProcessingTime
  - EstimatedProgramEndTime
  - EstimatedProductionPlanEndTime
  - FeedrateOverride
  - PartProgramName
  - PartStationNumber
  - Running
  - PartProgramRunning
  - Stopped
  - PartProgramStopped
  - Aborted
  - PartProgramAborted
  - Ended
  - CurrentPartProgramEnded
  - StoppedMalfunction
  - StoppedOperator
  - PartProgramStoppedOperator
  - PartProgramReentry
  - UserMessage
  - PartGrossRunTime
  - PartNetRunTime
  - PartNetProcessingTime
  - PartEstimatedProgramEndTime
  - PreEstimatedProgramRunTime
  - DrivesStartingUp
  - DrivesSwitchedOn
  - HomedAndReadyForUse
  - ReadyForUse
  - MachineActive
  - MachineInterrupted
  - DrivesShuttingDown
  - DrivesSwitchedOff
  - SystemShutdownActive
  - NetBeamOnTime
  - LaserEmissionOn
  - AutoMode
  - JogMode
  - MdaMode
  - EmergencyStop
  - FeedHold
  - LightBarrier1
  - LightBarrier2
  - LightBarrier3
  - LightBarrier4
  - LightBarrier5
  - SafetyDoor1
  - SafetyDoor2
  - SafetyDoor3
  - SafetyDoor4
  - SafetyDoor5
  - EmergencyStopAutomation1
  - EmergencyStopAutomation2
  - EmergencyStopAutomation3
  - EmergencyStopAutomation4
  - EmergencyStopAutomation5
  - EmergencyStopStartPillar1
  - EmergencyStopStartPillar2
  - EmergencyStopStartPillar3
  - EmergencyStopStartPillar4
  - EmergencyStopStartPillar5
  - EmergencyStopControlPanel1
  - EmergencyStopControlPanel2
  - EmergencyStopControlPanel3
  - EmergencyStopControlPanel4
  - MessagesOnHold
  - MessageList
  - MachineMessages
Common Issues
Machine stuck in "Connecting" in the Proxy tool
- Verify the machine is powered on and network cables are seated
- Confirm the OPC UA tab on the machine shows the correct Proxy address (
opc.tcp://<proxy>:12120) - Hostname entries in the Proxy are case-sensitive — verify exact match
- Check Windows firewall on the Proxy server for ports
12120and11878
MachineMetrics adapter connects but immediately drops / security error
- Confirm
security-policy: Basic256Sha256andsecurity-mode: SignAndEncryptare set in the adapter script - Check the Client Management tab in the Proxy tool — accept the MM certificate if it shows Rejected
OPC-UA interface not available / machine shows no data
- The interface has not been licensed — customer contacts Trumpf Technical Service or their sales rep
- Machine may need to be connected to the TelePresence Portal for remote license activation
No MyTRUMPF access to download Proxy software
- Customer contacts local Trumpf sales/service company to request the installation package directly
Responsibility Summary
| Step | Owner |
|---|---|
| Purchase / activate OPC-UA interface license | Customer (via Trumpf rep) |
| Download and install OPC UA Proxy software | Customer |
| Configure machine to point at Proxy | Customer or Trumpf service |
| Accept MM certificate in Client Management tab | Customer (Trumpf Proxy admin) |
| Configure MM adapter with Proxy endpoint | MachineMetrics TO team |
| Validate data in MachineMetrics | MachineMetrics TO team |
Resources
- Trumpf Technical Service (US): 1-888-878-6737
- MyTRUMPF portal: trumpf.com/en_US/mytrumpf
- Trumpf T1327 Technical Information: Digital machine connection with OPC UA Proxy (request from Trumpf rep or via MyTRUMPF)
- Trumpf OPC-UA GitHub examples: github.com/TRUMPF-IoT/OpcUaMachineTools
Contact support@machinemetrics.com if you need assistance with Trumpf connectivity setup.
Adding the Machine in MachineMetrics
Once OPC-UA is enabled and network is configured:
Step 1: Browse OPC-UA Server First
Before adding in MachineMetrics, use an OPC-UA client to:
- Verify you can connect to the server
- Browse available data nodes
- Document node IDs for relevant data
- Create data map/tag list
Step 2: Log into MachineMetrics
- Navigate to Assets → Machines
- Click Add Machine
Step 3: Enter Machine Details
- Machine Name: Descriptive name
- Make: Manufacturer
- Model: Machine model
- Select Edge Device: Choose your Edge
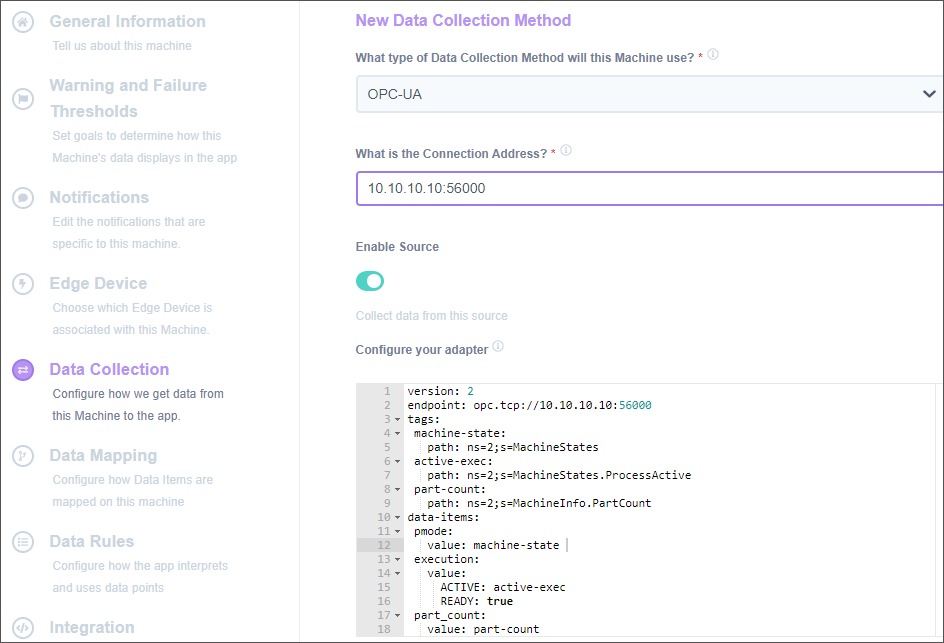
Step 4: Configure OPC-UA Adapter
- Adapter Type: Select OPC-UA
- Connection String:
opc.tcp://[ip-address]:[port]- Example:
opc.tcp://192.168.1.100:4840
- Example:
- Username: If authentication required
- Password: If authentication required
- Security Mode: None, Sign, or SignAndEncrypt
- Security Policy: None, Basic256, Basic256Sha256
- Click Test Connection
Step 5: Verify Connection
- Test should return success
- If fails: Check connection string, credentials, firewall
- Click Save when successful
Step 6: Configure Adapter Script
This is where you define which data nodes to collect.
- See OPC-UA Adapter Scripts section
- Use YAML format to define tags, variables, and data items
Configuring Data Collection
Available Data Items
Data available through OPC-UA varies widely by implementation. Common items include:
Machine Status:
- Execution state (running, idle, stopped)
- Controller mode (AUTO, MDI, MANUAL)
- Alarm status
Program Information:
- Program name
- Line number
- Block counter
Production Metrics:
- Part count (various methods)
- Cycle time
- Run time
Machine Parameters:
- Spindle speed and load
- Feed rate and override
- Axis positions
- Tool number
Alarms & Diagnostics:
- Active alarms with codes
- Alarm history
- Diagnostic values
Custom Data:
- Process parameters
- Quality measurements
- Automation status
- Equipment-specific values
OPC-UA Adapter Scripts
MachineMetrics uses YAML configuration to map OPC-UA data to our standard model.
Script Structure:
version: 2
username: your-username  # If required
password: your-password  # If required
security-mode: Sign  # None, Sign, or SignAndEncrypt
security-policy: Basic256Sha256  # or Basic256, Basic128Rsa15, None

tags:
  # Define data nodes to monitor

variables:
  # Transform and model data

data-items:
  # Specify which items to send to MachineMetrics
Read Options
By default, the adapter creates an OPC-UA subscription and receives data only when values change. Some servers do not support subscriptions or may not send initial values as expected. Use these options to adjust read behavior:
read-mode
| Value | Description |
|---|---|
subscription | (Default) Create a subscription; server pushes data when values change |
polling | Read all configured tags on a regular interval instead |
Use polling when:
- The server does not support subscriptions
- The server does not send data when expected
- You experience missing or delayed updates with subscription mode
Note: Polling may not be appropriate if a large number of tags are configured, as it reads all tags on each interval.
scan-interval
When read-mode: polling is set, scan-interval is the number of seconds between reads. Must be greater than 0. Default: 1.0.
read-mode: polling
scan-interval: 2.0  # Read all tags every 2 seconds
force-read-on-connect
When set to true, the adapter explicitly reads all tags when the connection is established or reestablished. Use this when a server does not send the current value of all tags when opening a subscription.
force-read-on-connect: true
Example with read options:
version: 2
read-mode: polling
scan-interval: 1.5
force-read-on-connect: true
username: OpcUaClient
password: YourSecurePassword
security-mode: Sign
security-policy: Basic256Sha256

tags:
  spindle-speed:
    path: ns=2;s=/Nck/LogicalSpindle/actSpeed
  # ... more tags
Tags Configuration
Tags define references to specific nodes in the OPC-UA address space.
Simple Tag (Direct Value):
tags:
  spindle-speed:
    path: ns=2;s=/Nck/Spindle/actSpeed
  program-name:
    path: ns=2;s=/Channel/ProgramInfo/progName
Complex Type Tag (Object with Properties):
tags:
  part-quantity:
    path: ns=2;s=/Laser/CurrentPlan
    property: partQuantity
This retrieves the partQuantity property from the CurrentPlan object.
Reading Array Elements:
To read a specific element from an OPC-UA array, add an index property to your tag definition:
tags:
  operation-state:
    path: ns=2;s=thing-that-is-an-array
    index: 3
Key details:
- Single element:
index: value(e.g.,index: 3reads the 4th element) - Range:
index: start:end(e.g.,index: 0:5reads elements 0 through 5) - Zero-based: Indexing starts at 0
- Adapter version: Requires OPC-UA adapter version 1.34.2 or later
Reading multiple values from the same array:
You can reference the same path with different indexes to read multiple elements from one array:
tags:
  tag-pdsp-feed-ovr:
    path: ns=3;s=NC/System/PDSP
    index: 115
  tag-pdsp-spindle-ovr:
    path: ns=3;s=NC/System/PDSP
    index: 116
Variables and Transformations
Variables transform tag values into MachineMetrics standard model.
Pass-Through (No Transformation):
variables:
  spindle-rpm:
    - source: spindle-speed
State Transformation (Conditional Logic):
variables:
  execution:
    - source: prog-status
    - state:
      - INTERRUPTED: this == 1
      - STOPPED: this == 2 or this == 5
      - ACTIVE: this == 3 or this == 4
      - READY: true  # Fallback
Count on Value Change:
variables:
  part-count:
    - source: part-quantity
    - value-change
    - count
Mathematical Operations:
variables:
  execution:
    - source: laser-power
    - state:
      - ACTIVE: this > 0
      - READY: true
Data Mapping
After adapter script is configured, map data items in MachineMetrics:
Step 1: Edit Machine
- Assets → Machines → [Your Machine]
- Go to Data Mapping tab
- Click Refresh List to see new items
Step 2: Map Each Data Item
For each data item from your script:
- Select Type (e.g., "Part Count", "Sample", "Event")
- Select Subtype (e.g., "Actual", "Speed", "Status")
- Assign Component (e.g., "Spindle", "Controller")
- Add Display Name (human-readable description)
Step 3: Save Mappings
- Review all mappings
- Click Save Changes
- Data will now flow to MachineMetrics dashboards and reports
Sample Configurations
Tip: Use Max — MachineMetrics’ AI assistant — to help generate or refine an OPC-UA adapter script for your nodes and variables. The examples below are starting points.
Siemens 840D Sample Script
version: 2
username: OpcUaClient
password: YourSecurePassword
security-mode: Sign
security-policy: Basic256Sha256

tags:
  tool-group:
    path: ns=2;s=/Channel/State/actToolIdent
  tool-num:
    path: ns=2;s=/Channel/State/actTNumber
  line-number:
    path: ns=2;s=/Channel/ProgramInfo/actLineNumber
  spindle-load:
    path: ns=2;s=/Nck/Spindle/driveLoad
  prog-status:
    path: ns=2;s=/Channel/State/progStatus
  controller-op-mode:
    path: ns=2;s=/Bag/State/opMode
  spindle-speed:
    path: ns=2;s=/Nck/LogicalSpindle/actSpeed
  last-alarm-number:
    path: ns=2;s=/Nck/LastAlarm/alarmNo
  feed-rate:
    path: ns=2;s=/Channel/MachineAxis/actFeedRate
  prog-name:
    path: ns=2;s=/Channel/ProgramInfo/progName
  act-parts:
    path: ns=2;s=/Channel/State/actParts
  feedrate-ovr:
    path: ns=2;s=/Channel/MachineAxis/feedRateOvr

variables:
  execution:
    - source: prog-status
    - state:
      - INTERRUPTED: this == 1
      - STOPPED: this == 2 or this == 5
      - ACTIVE: this == 3 or this == 4
      - READY: true
  controller-mode:
    - source: controller-op-mode
    - state:
      - MANUAL: this == 0
      - MANUAL_DATA_INPUT: this == 1
      - AUTOMATIC: this == 2

data-items:
  - execution
  - controller-mode
  - spindle-speed
  - spindle-load
  - feed-rate
  - feedrate-ovr
  - last-alarm-number
  - line-number
  - tool-group
  - tool-num
  - prog-name
  - act-parts
Note: This script is valid for Siemens 828/840D SL controls. Node paths may differ for other machines.
Brother Sample Script
Sample configuration for Brother D-Series CNC machines available from MachineMetrics support.
Connection:
- Port: 4840
- Security: Typically Type2
- Format IP correctly in control (12-digit numeric)
Generic Laser Cutter Script
version: 2
tags:
  part-quantity:
    path: ns=2;s=Laser.CurrentPlan
    property: partQuantity
  laser-power:
    path: ns=2;s=Laser.CurrentLaserPower
  cut-state:
    path: ns=2;s=Laser.CurrentCutState

variables:
  part-count:
    - source: part-quantity
    - value-change
    - count
  execution:
    - source: laser-power
    - state:
      - ACTIVE: this > 0
      - READY: true

data-items:
  - execution
  - part-count
  - part-quantity
  - cut-state
Explanation:
part-count: Counts each timepart-quantitychangesexecution: ACTIVE when laser power > 0, otherwise READY- Direct pass-through for
part-quantityandcut-state
Certificate Management
Understanding Certificates
OPC-UA uses X.509 certificates for security:
- Server Certificate: Identifies the machine/server
- Client Certificate: Identifies MachineMetrics Edge
- Both sides must trust each other's certificates
Accepting Certificates
On Siemens Controls:
- Startup → Network → OPC UA → Certificates
- Pending certificates appear when client first connects
- Select client certificate → Accept
- MachineMetrics Edge must also trust server certificate (usually automatic)
On Other Controls:
- Process varies by manufacturer
- Check control documentation
- May auto-accept or require manual approval
Testing During Setup:
- Can enable "Accept certificates automatically" initially
- Disable after confirming connection works
- For production, use proper certificate validation
Certificate Errors:
- Usually appear as connection failures
- Check that certificates are accepted on both sides
- Verify certificate hasn't expired
- Check system time/date on both devices
OEM-Specific Notes
Siemens Sinumerik 828/840D SL
Key Points:
- Requires OPC-UA license purchase
- Typically uses X130 port (company network) - but always verify with your machine documentation
- CRITICAL: Different machine tool builders use different port designations
- Connecting to the wrong port can brick the machine - these machines have complex internal networks and PROFIBUS
- Never modify system network (192.168.214.x / 215.x)
- Default manufacturer password: SUNRISE
- Port: 4840
- Requires restart after configuration
Version-Specific Guides:
- Different Operate versions have slightly different menus
- See Additional Resources section for version-specific PDFs
- Always verify your Operate version first
Finding Operate Version:
- Startup area → Version or Version display soft key
- Look for "SINUMERIK Operate Version" (e.g., 4.7 SP2 HF3)
Brother D-Series CNC
Key Points:
- IP address format is 12-digit numeric (not standard dot notation)
- Port: 4840
- Security Type2 common
- Must save settings or they're lost
- Communication monitor confirms OPC-UA activity
IP Format Examples:
172.22.3.34→ Enter as17202200303410.1.50.200→ Enter as010001050200- Pad each octet to exactly 3 digits
Verification:
- Use Communication monitor to verify OPC-UA activity
- Ethernet information screen confirms IP settings
Bystronic
Key Points:
- Port: 56000 (not standard 4840)
- Requires both TCP and UDP firewall rules
- Must reboot entire machine (not just PC)
- Enable in Modules → Administration → Advanced Settings
Unique Port:
- Bystronic uses port 56000 instead of standard 4840
- Must open both TCP and UDP for this port
Okuma OSP-P500
Key Points:
- Requires OPC UA for Machine Tools option (separate from MTConnect license)
- Port: 4840 (standard OPC-UA)
- Access via Admin Launcher → Item #11 (OPC UA) → System → Open
- Must enable OPC Function (set from Disable → Enable)
- Click Apply to save changes, then restart the control for OPC-UA to become active
- Configure user credentials in User Settings — these go into the MachineMetrics adapter script
- Security mode and policy must match the MachineMetrics adapter configuration
- Use
SignAndEncrypt/Basic256Sha256for production environments
Navigation Path: CNC screen → Puzzle Icon → Gear → Admin Launcher → Item #11 OPC UA → System → Open
Trumpf
Key Points:
- Uses proxy-based architecture — edge never connects to machine IP directly
- Edge connects to OPC UA Proxy on port
11878(client-facing) - Proxy connects to machines on port
12120(machine-facing) - OPC-UA interface is a licensed option per machine — must be purchased separately
- Proxy software downloaded via MyTRUMPF (customer responsibility to install)
- Security mode: SignAndEncrypt / Basic256Sha256 (required for Proxy v2.x+)
- MachineMetrics certificate must be accepted in the Proxy's Client Management tab (one-time step per edge device)
Endpoint format:
opc.tcp://<proxy_server_hostname>:11878(use hostname, not machine IP)
Trumpf Technical Service (US): 1-888-878-6737
Fanuc Robots
Key Points:
- Fanuc robots support OPC-UA
- Typically port 4880
- Requires network configuration on robot controller
- Data structure varies by robot model
Contact:
- Fanuc robot support for specific configuration
- MachineMetrics support for adapter script assistance
Other OPC-UA Equipment
Generic Process:
- Verify OPC-UA is licensed and enabled
- Determine port number
- Get data map from manufacturer
- Use OPC-UA client to browse server
- Create adapter script based on relevant nodes
- Work with MachineMetrics support for script development
Troubleshooting
Connection Issues
Problem: Can't connect to OPC-UA server
Diagnostic Steps:
-
Verify Network Connectivity
- Ping machine IP from Edge or computer
- If ping fails: network problem
- If ping succeeds: OPC-UA configuration issue
-
Test with OPC-UA Client
- Use UaExpert or similar tool
- Try connecting from a computer on same network
- Try endpoint:
opc.tcp://[machine-ip]:[port] - If client can't connect: OPC-UA not properly enabled
-
Verify Port Number
- Common ports: 4840, 56000 (Bystronic), 49320 (Kepware), 4880 (Fanuc robots)
- Check machine documentation
- Try different ports if unsure
-
Check Firewall
- Windows Firewall on control may block OPC-UA port
- Temporarily disable to test (re-enable after)
- Or create firewall rule for OPC-UA port
-
Verify OPC-UA Service
- Check that OPC-UA server is enabled on machine
- May be in license settings, network settings, or services
Authentication Failures
Problem: Connection fails with authentication error
Solutions:
-
Verify Credentials
- Double-check username and password
- Case-sensitive
- No extra spaces
-
Check Authentication Settings
- Verify username/password is configured on machine
- Some machines require creating OPC-UA user account
- Check if anonymous access is enabled (for testing)
-
Security Mode Mismatch
- Verify security mode matches machine configuration
- Try None, Sign, then SignAndEncrypt
- Must match what machine expects
-
Security Policy Mismatch
- Verify policy matches machine capability
- Try None, then Basic256, then Basic256Sha256
- Older equipment may only support Basic128Rsa15
Certificate Errors
Problem: Certificate validation failures
Solutions:
-
Accept Certificates
- On machine: Accept MachineMetrics Edge certificate
- On Edge: Usually accepts automatically
- Check pending certificates on machine
-
Check System Time
- Certificates have validity periods
- If machine or Edge time is wrong, certificates fail
- Sync time via NTP
-
Regenerate Certificates
- May need to clear and regenerate
- Contact MachineMetrics support for assistance
-
Temporary: Disable Certificate Validation
- For testing only
- Enable "Accept certificates automatically"
- Properly configure for production
No Data Appearing
Problem: Connected but no data in MachineMetrics
Solutions:
-
Check Adapter Script
- Verify YAML syntax is correct
- Ensure tags reference valid node IDs
- Test node IDs in OPC-UA client first
-
Verify Data Mapping
- Assets → Machines → Data Mapping
- Ensure data items from script are mapped
- Check for unmapped items
Part Count Issues
Problem: Part counts not incrementing or incorrect
⚠️ CRITICAL FIRST STEP: Verify Machine is Counting Parts
Before troubleshooting MachineMetrics configuration, verify the machine itself is incrementing its internal part counter.
MachineMetrics reads the machine's native part counter via OPC-UA. If the machine isn't counting parts, MachineMetrics cannot report them. Without additional scripting or configuration, MachineMetrics relies entirely on the machine's internal part count signal exposed via OPC-UA.
See the Connectivity Validation Guide for a visual guide to identifying healthy vs. problematic part count patterns — including what sporadic counts and sub-second cycle times look like.
Check Machine Part Counter:
- Look at the machine's control screen or HMI
- Find the part counter display (varies by machine/OEM)
- Run a cycle
- Verify the counter increments on the machine itself
If the machine counter is NOT incrementing:
- This is a machine configuration issue, not a MachineMetrics issue
- Machine is not configured to count parts
- Consult machine manual or OEM for part counting configuration
- May require enabling part counting in machine settings
If the machine counter IS incrementing but MachineMetrics shows zero:
- This is a MachineMetrics or OPC-UA configuration issue
- Continue to diagnostic steps below
Diagnostic Steps:
-
Verify Part Count Tag in OPC-UA
- Use OPC-UA client (UaExpert) to browse server
- Find part count tag/node ID
- Watch tag value while running machine
- If tag doesn't increment in OPC-UA client: Machine not exposing part count
-
Check Adapter Script
- Verify part count tag is referenced in YAML script
- Ensure node ID is correct (copy from OPC-UA client)
- Verify
data-itemsincludes part count variable
-
Check Data Mapping
- Assets → Machines → Data Mapping
- Ensure part count data item is mapped
- Type should be "Part Count"
-
Test with OPC-UA Client
- Connect to machine with UaExpert
- Monitor part count tag in real-time
- Run a cycle on machine
- If tag increments in UaExpert but not MachineMetrics: Configuration issue
- If tag doesn't increment in UaExpert: Machine not counting parts
Common OEM-Specific Notes:
- Bystronic: Look for
Production.PartCounteror similar in OPC-UA tree - Siemens: Check
DB(Data Block) for part count variable - Fanuc Robots: May require program command to increment counter (e.g.,
R[1]=R[1]+1)
-
Check Machine Status
- Machine may need to be running to generate some data
- Verify OPC-UA server is active
-
Review Edge Logs
- Settings → Edge Devices → Logs
- Look for OPC-UA errors
- Check for node ID errors or parsing issues
-
Test with Simple Script First
- Start with minimal configuration
- Add one or two tags
- Verify those work before adding more
Firewall Issues
Problem: Can connect locally but not from network
See Also: Network Requirements Guide for Edge device firewall requirements.
Solutions:
-
Windows Firewall (On Machine)
- Open Windows Firewall settings
- Create inbound rule for OPC-UA port
- Allow TCP and UDP
- Apply to all profiles
-
Network Firewall
- Work with IT team
- Ensure OPC-UA port allowed between machine and Edge
- May need exception for specific IP addresses
-
Test Locally First
- On machine control, use OPC-UA client
- Connect to
opc.tcp://localhost:[port] - If this works but remote doesn't: firewall
Best Practices
Planning:
- Browse OPC-UA server before configuration
- Create comprehensive data map with manufacturer's help
- Start with essential data items, add more later
- Document all node IDs and their meanings
Security:
- Use strong passwords for OPC-UA accounts
- Use Sign or SignAndEncrypt security mode
- Properly manage certificates
- Don't use anonymous access in production
- Use dedicated network for machine connectivity
Network:
- Use static IP addresses
- Document IP, port, and credentials
- Test connectivity before full configuration
- Keep machine firewall rules documented
Configuration:
- Start with simple adapter script
- Test incrementally (add tags one at a time if issues)
- Validate data accuracy against machine display
- Keep backup of working configurations
Data Mapping:
- Use descriptive display names
- Map all relevant data items
- Assign proper types and subtypes
- Review mappings for accuracy
Maintenance:
- Monitor for connection errors in Edge logs
- Keep OPC-UA server software updated
- Review certificate expiration dates
- Document any configuration changes made
Working with Manufacturers:
- Request complete data map/node list
- Ask for recommended node IDs for status, count, etc.
- Get clarification on data types and units
- Request sample configurations if available
Additional Resources
OPC Foundation:
- Official website: opcfoundation.org
- OPC-UA specification
- Client tool downloads
- Training and certification
OPC-UA Client Tools:
- UaExpert (GUI, Windows)
- python-opcua (Command line)
- opcua-commander (Interactive terminal)
Standards:
- UMATI (Universal Machine Tool Interface)
- MTConnect OPC-UA Companion Specification
- Industry-specific OPC-UA standards (emerging)
MachineMetrics Resources:
- Machine Connectivity Overview
- OPC-UA adapter script examples (contact support)
Getting Help
Before Contacting Support
Gather this information:
-
Machine Details
- Make, model, serial number
- Control type and version
- OPC-UA license status
-
Network Configuration
- Machine IP address and port
- Connection string used
- Can you ping the machine?
-
OPC-UA Browsing Results
- Can you connect with UaExpert or other client?
- What data nodes are available?
- Node ID examples
-
Current Configuration
- Adapter script (YAML)
- Data mapping configuration
- Any error messages from Edge logs
-
Authentication & Security
- Security mode and policy used
- Username (don't include password in emails)
- Certificate status
Contact Options
MachineMetrics Support:
- Email: support@machinemetrics.com
- Include all information above
- Attach screenshots
- Include adapter script (sanitize passwords)
Machine Manufacturer:
- For OPC-UA license/enablement
- For data map and node ID documentation
- For control-specific configuration
- For software updates
Solution Delivery Manager (SDM):
- For deployment planning
- For adapter script development assistance
- For best practices and optimization
OPC Foundation:
- For protocol questions
- For client tool support
- For standards documentation
Ready to connect your OPC-UA machine?
- Verify OPC-UA support and licensing
- Browse OPC-UA server to identify data nodes
- Configure network and enable OPC-UA
- Create adapter script for your machine
- Add machine in MachineMetrics
- Map data items
- Verify data flow
Questions? Contact support@machinemetrics.com with your machine details and data map.
Need adapter script help? MachineMetrics support can assist with creating custom OPC-UA adapter scripts based on your machine's data structure.